Blog Post for Mobile Development for Social Change
Table of Contents
- Rationale
- What Are We Building?
- Setting up Your Project
- Intro to UX Design and Navigation Architecture
- Setting up Google Authentication and linking with Firebase Auth
- Setting up Database Models and Realtime Database
- Data Read/Write from your Realtime Database
- Wrapping Up
Rationale
Developing an Android app can be a daunting task. Stringing together the user interface with proper functionalities takes hours of sifting through the Android docs and StackOverflow. However, with the time and effort that the Android community and Google has put in to create support frameworks for developers, the learning curve and time requirement to make a functional app have been dramatically reduced.
In this tutorial, we’re going to explore some of these features and use them to implement a simple but fully functional and practical (to a specific niche of people i.e. college students) Android app. The features we’re going to be using are briefly explained below, with more to come later:
-
Android Navigation Architecture Component: This architecture component comes with a nifty set of features that makes the Android UX design and implementation much easier for the developer.
-
Firebase Authentication and Realtime Database: These Firebase components provide easy and secure authentication and database access for developers, reducing a significant amount of overload that would go into managing those two aspects of product development on the developers.
Pre-requisites
-
Android Studio >= 3.2: This is crucial for this project since we’re going to be using some features that I know work well with Studio 3.2.
-
A working internet connection: Since we’ll be using a remote database and authentication, it is important to have access to the Internet throughout this tutorial.
-
A Google Account: You’re going to need a Google account to get started with Google Firebase, and since we’ll be implementing direct Google Sign In methods in the app, you can use it for runtime testing purposes as well.
-
Basic Java knowledge. Preliminary Android knowledge will be helpful.
What are We Building?
We’re going to be building Meal Counter, a reminder/logging app for college students on partial meal plans. At Haverford College (the college I attend), students can opt to go for the partial meal plan, which gives them a finite amount of meals to consume at the college dining center. College students don’t really have the time to manually log how many meals they’ve consumed, so this app is going to help them with this crucial aspect of responsibility.
Basic functionalities of the App
-
The user logs in with their Google account
-
After successful login, an “Enter Initial Number of Meals” dialog is presented, in which they enter an integer value
-
The main user interface consists of two buttons: “Swipe” and “Edit Number of Meals”
-
Swipe deducts a meal from the current meal count
-
Edit overwrites the previous meal count with the latest user-defined one
-
-
Swipe time and number of meals left are logged in the database, so that the user can use this app on any Android device with their Google account
In this tutorial, our main focus will be in using the tools and not in the look-and-feel of the app. Having said that, I will provide most of the XML layout source code so that adding in the Java logic is the part we can focus on.
Setting Up your Project
Creating your New Project
-
Open Android Studio
-
Click on File>New>New Project
-
Enter the appropriate details and press Next
-
On Target Devices, I have chosen Android 15, as suggested by Studio
-
On “Add and Activity” window, select “Empty Activity” and press Next
-
You can name your activity anything you want, I named mine the usual “MainActivity” (make sure you have “AppCompat” selected)
-
Click on “Finish”, let the gradle build proceed
-
After this is done, click on File>Settings… and on the left pane select “Experimental”. Select the checkbox “Enable Navigation Editor”. This will let you create user flows smoothly.
-
In your Android Project structure to the left, right click on app/res and select “New>Android Resource File”. In the File name field, type any name you wish, such as “nav_graph”. From the Resource Type dropdown list, select Navigation. Click OK.
-
This will create the navigation graph for you. We will be using this in the next section to build UX flows.
Managing Your Firebase Components Now we’re going to get Firebase setup with your project. Android Studio provides a painless Firebase integration and we’re going to make use of that.
- In Android Studio, click on Tools>Firebase. An assistant similar to the diagram in the right will appear. Open up Authentication and click on “Email and password authentication”. This will present you with two options, the first being “Connect your app to Firebase”. Click on it to get a prompt to log into your Google account and create a new Firebase project for your app. You’re only going to need to enter the app’s name; everything else is automatic.

WARNING: the Assistant also tries to add dependencies and run gradle build based on the dependencies. However, this might fail with the error shown on the right. Click on “Open File”, go to the line that says “implementation 'com.google.firebase:firebase-auth:16.0.1:15.0.0'” and delete “:15.0.0” from that string. This will solve the dependency issues. You might encounter this in the future while adding database integration, but the fix is the same.

- Repeat the steps above with the Realtime Database option in the Firebase Assistant.
Note: After these steps, Firebase will generate a google-services.json file in your project directory. The best practices would be not to expose this file to the Internet (e.g. by committing it to a public repository) as it contains (not necessarily sensitive) information on your app’s integration with Firebase.
-
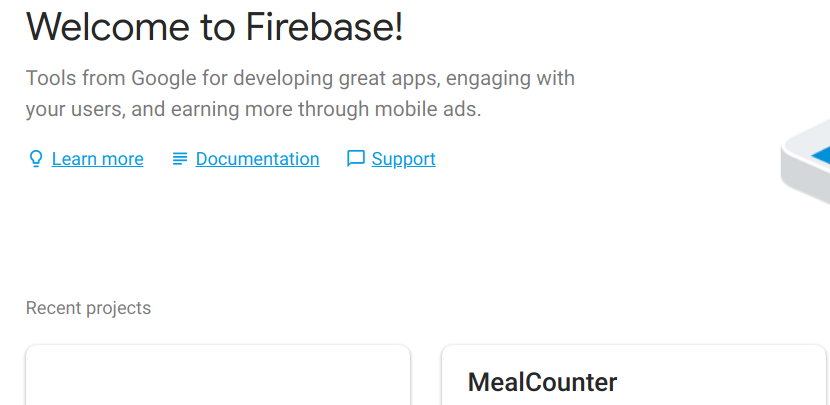
Go to Firebase Web Client and login with the same account you used in Android Studio. On the top right corner of the homepage, select “Go to Console”. You should see something similar to this:
-
Click on “MealCounter” (in this case, your app name when you were setting up the Firebase integration). This will take you to the console for MealCounter.
-
On the left sidebar, you will see several options, including Authentication and Database. Click on Authentication
-
On the Authentication window, select “Sign-in Method” tab. This will provide you with a list of authentication methods. Click on “Google” and select the Enable radio button. This will expose the Google authentication API for your app to use.
-
Now click on Database from the left pane. In the resulting page, select “Create Realtime Database” and this will create the database for you. We will come back to it later.
If you’ve successfully followed these steps, you will be ready to develop your Android app in no time.
Intro to UX Design and Navigation Architecture
At present, just making an app doesn’t suffice. The app has to be visually appealing, effortless and intuitive to use. Thus, a lot of thought goes into designing the app. And a crucial part of any app is its user flow. This gives the developers a solid idea of what they’re trying to build and helps them stay on track. In this part, we will be making use of Android Navigation Architecture’s Navigation Editor to create a simple user flow (also called navigation graph in Android) for Meal Counter.
- Go to “res>navigation>nav_graph.xml”. This will open the Navigation Editor for you. If it doesn’t, you can select “Design” from the bottom left of the open section.
-
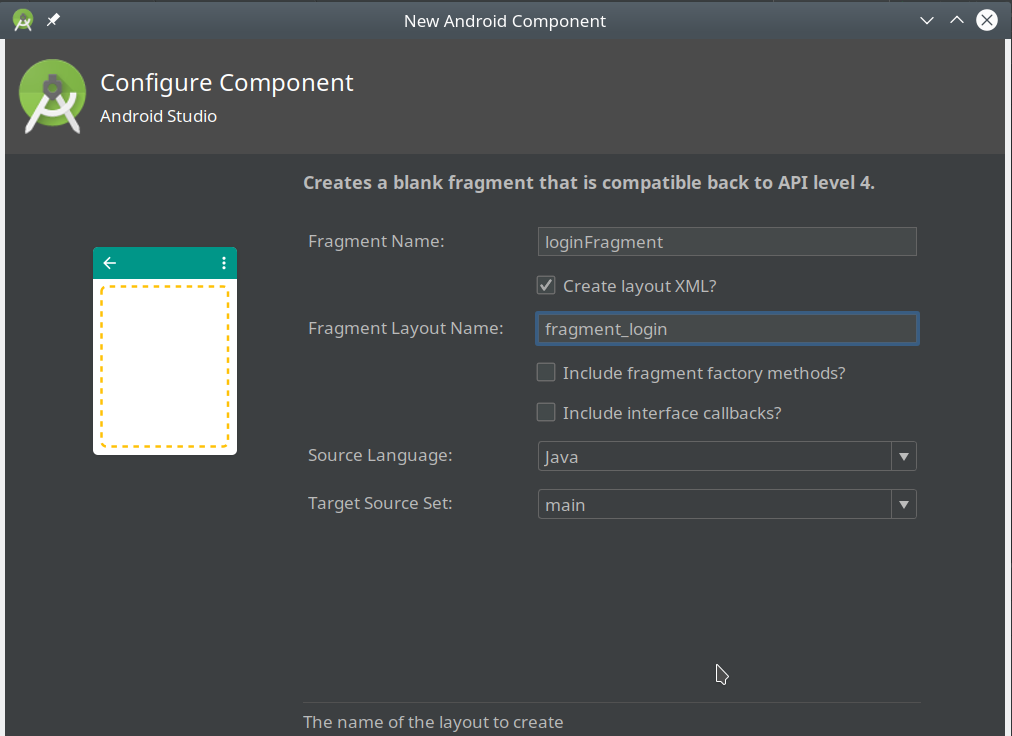
Once you have the editor open, click on New Destination
. In the dialog, select “Create blank destination”. In the Fragment name field, enter
loginFragment. Select “Create layout XML?” and deselect “Include fragment factory methods?” and “include interface callbacks?”. Then click on Finish. -
Repeat step 2 for
homePageFragmentandupdateMealsFragment. -
After you’re done, there will be two new fragment classes in your java directory along with their corresponding layout files in
res/directory. -
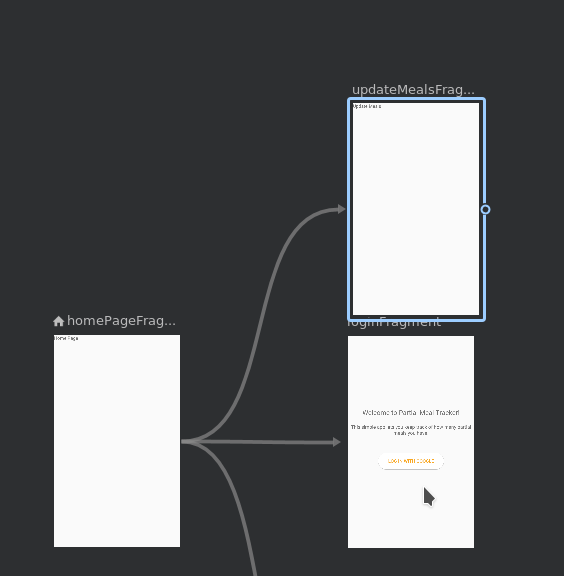
Now let’s draw the user flow. When the user opens the app, we want to show the homepage if the user is logged in. In the Navigation Editor, select the
homePageFragmentpreview and select “Set start destination” on its Attributes pane on the right. -
Now, hover over the right side of the
homePageFragmentand you’ll see a circle. Click and drag from that circle tologinFragmentandupdateMealsFragment. This defines “Actions” to the two fragments, enabling us to swap outhomePageFragmentwith either of the two as necessary during runtime. - Now right click on your
java/<package_name>folder and selectNew>Java Class. Name itSharedViewModel.javaand save it in the top level along with the other fragments andMainActivity. We will get to thisSharedViewModelsoon.
Now let’s get to the bulk of the Java logic in our app. At first, we want to tie the navigation up with the MainActivity. For this, we’re going to use a fragment on MainActivity as the initial host for all the other fragments we just defined.
- Open
activity_main.xml. In the Palette pane in Preview, selectContainers>NavHostFragmentand drag it to the preview render. This will add something similar to the following on youractivity_main.xml:
  File: <app_name>/res/layout/activity_main.xml

  <fragment
      android:id="@+id/fragment"
  	android:name="androidx.navigation.fragment.NavHostFragment"
  	android:layout_width="0dp"
  	android:layout_height="0dp"
  	app:defaultNavHost="true"
  	app:layout_constraintBottom_toBottomOf="parent"
  	app:layout_constraintEnd_toEndOf="parent"
  	app:layout_constraintStart_toStartOf="parent"
  	app:layout_constraintTop_toTopOf="parent"
  	app:navGraph="@navigation/nav_graph" />
Make sure app:navGraph is defined in the fragment. This helps connect your Fragment logic to the layout via the Navigation Architecture.
-
Let’s take a step back. Once the user launches the app, we want to check if the user is authenticated with Firebase Auth. If not, then we navigate the user to the
loginFragmentand allow them to sign in. -
Let’s implement this logic onto your
MainActivityand fragments. At this point, it’s worth mentioning theSharedViewModelclass we just made a bit earlier. This class is going to be our “transient UI data” class. Namely, as long as the app is running/in the background of the Android system, all the crucial runtime-level data will be stored in the app. Why is this important? ThisViewModelconcept was introduced to take care of a very common phenomenon: every time an activity is paused or destroyed (for example, when a user navigates away from the app), all the transient data in the activity is destroyed as well. A common example of this is change in orientation. If you, for example, were trying to write a note in an app that doesn’t save data between orientation change, rotating that app will make you lose all the changes you’ve made before saving it. This is where theViewModelclass comes in. All activities and fragments can access the instance of this class during runtime, and the contents of this class are destroyed only when the user fully exits the app. For our purposes, we’re going to be using aSharedViewModelclass that inherits fromViewModeland is shared between all the fragments during runtime. - Open
SharedViewModel.java. Make it extend ViewModel like so:public class SharedViewModel extends ViewModel {} - For enabling Firebase authentication, create a member variable in
SharedViewModeland create a getter for it:File: <app_name>/java/SharedViewModel.java private FirebaseAuth mAuth = FirebaseAuth.getInstance(); public FirebaseAuth getAuth() { return mAuth; } - In MainActivity, add the following lines (or replace them where necessary):
File: <app_name>/java/MainActivity.java

private SharedViewModel mSharedViewModel;
private NavController mController;
@Override
protected void onCreate(Bundle savedInstanceState) {
super.onCreate(savedInstanceState);
setContentView(R.layout.activity_main);
mSharedViewModel = ViewModelProviders.of(this).get(SharedViewModel.class);
mController = Navigation.findNavController(this, R.id.fragment);
Let’s take this code apart. The first two lines instantiate a SharedViewModel object and a NavController object. A NavController object gives us all the resources we need to navigate between fragments. Inside the onCreate() method, we set mSharedViewModel using the ViewModelProviders.of() method to expose its Firebase Auth variable. After that, we assign Controller to find the navigation controller of the current activity and target the NavHostFragment as a host for swapping other fragments in.
- Let’s implement a method in MainActivity named checkUserLogin:
File: <app_name>/java/MainActivity.java

public void checkUserLogin(FirebaseAuth auth) {
    FirebaseUser currentUser = auth.getCurrentUser();
    if (currentUser == null) {
        mController.navigate(R.id.loginFragment);
}
This method takes in a
FirebaseAuthobject (inMainActivity, this would bemAuth) and checks if the user credentials exist. If the user is logged in, thenmControllernavigates tohomePageFragmentautomatically. SincehomePageFragmentis already defined as a start destination in our nav graph, MainActivity will automatically render if it we need it. Otherwise, the user is directed to theloginFragmentwhere they can enter their credentials. -
If you run the app now, you will be directed to the
loginFragmentimmediately, but there are two issues: theloginFragmentdoesn’t have any content, and pressing back button on that fragment gets you back tohomePageFragment. Let’s fix those. - Add the following to res/values/strings.xml:
File: <app_name>/res/values/strings.xml <string name="welcome">Welcome to Partial Meal Tracker!</string> <string name="welcome_desc">This simple app lets you keep track of how many partial meals you have.</string> <string name="login">Log In with Google</string> - Replace res/layout/fragment_login.xml with the following:
  File: <app_name>/res/layout/fragment_login.xml

  <?xml version="1.0" encoding="utf-8"?>
  <android.support.constraint.ConstraintLayout
  	xmlns:android="http://schemas.android.com/apk/res/android"
  	xmlns:app="http://schemas.android.com/apk/res-auto"
  	xmlns:tools="http://schemas.android.com/tools"
  	android:layout_width="match_parent"
  	android:layout_height="match_parent"
  	tools:context=".fragments.loginFragment">

  	<LinearLayout
  	android:id="@+id/linearLayout2"
  	android:layout_width="0dp"
  	android:layout_height="match_parent"
  	android:gravity="center"
  	android:orientation="vertical"
  	app:layout_constraintEnd_toEndOf="parent"
  	app:layout_constraintStart_toStartOf="parent"
  	app:layout_constraintTop_toTopOf="parent">

  		<TextView
  		android:layout_width="wrap_content"
  		android:layout_height="wrap_content"
  		android:layout_marginBottom="20sp"
  		android:text="@string/welcome"
  		android:textSize="20sp" />

  		<TextView
  		android:layout_width="wrap_content"
  		android:layout_height="wrap_content"
  		android:layout_marginBottom="50sp"
  		android:gravity="center"
  		android:text="@string/welcome_desc"
  		android:textSize="15sp" />

  		<Button
  		android:id="@+id/login_button"
  		android:layout_width="200sp"
  		android:layout_height="50sp"
  		android:layout_gravity="center_horizontal"
  		android:layout_marginBottom="20sp"
  		android:background="@drawable/rounded_button"
  		android:text="@string/login"
  		android:textColor="@color/colorPrimary" />
  	</LinearLayout>
  </android.support.constraint.ConstraintLayout>
- After you’re done adding the XML layout, open
loginFragment.javato edit theonCreateView()method. If you notice the factory code in it, you’ll see something similar to the following:
 File: <app_name>/java/loginFragment.java

 return inflater.inflate(R.layout.fragment_login, container, false);
This simply finds the fragment’s layout XML and “inflates it” for the user to see (i.e. fill the screen with the fragment view elements) and interact with and returns the View. We’re going to need to modify this to get access to the Google Log In button before the view is returned. Change this method code to the following:
File: <app_name>/java/loginFragment.java

View v = inflater.inflate(R.layout.fragment_login, container, false);
return v;
For now, this saves a reference inside onCreateView for us to have access to the view objects inside the fragment’s view. Later we’ll use v to tie the button in for listening for user interaction.
-
Now if you run your app, your
loginFragmentwill show a welcome screen with a “Login with Google” button. Neat! -
Let’s prevent our user from going back to the home page when they’re not signed in. The
navControlleralso comes with a handygetCurrentDestination().getId()method which tells you theIdof the fragment on the screen at present. We’re going to use this to force the user to quit the app if they press back in the Login page. -
Override
MainActivity’sonBackPressed()like this:
  File: <app_name>/java/MainActivity.java

  @Override
  public void onBackPressed() {
  	if (mController.getCurrentDestination().getId() == R.id.loginFragment) {
  		moveTaskToBack(true);
  		finish();
  	}
  }
This checks if the current fragment is the Login fragment. If it is, then we finish the activity and quit the app.
Now that we’re done with the primary navigation UI, let’s move on to user authentication.
Setting Up Google Authentication and linking with Firebase Auth
User authentication in apps used to be a huge security concern in the past. Now, with Google’s Firebase API, integrating user authentication into your Android apps is easier than ever. We’re going to look at using the Google Sign In framework present natively on most Android devices, and we’re going to link up Firebase’s authentication with the native Google service.
Google provides a very useful pair of articles that you can use to setup Google auth on your apps and consequently linking the service to Firebase auth. These are linked here and here. I have consolidated the steps from the two articles below to tailor it to our project.
Before we delve in, I’d like to point out that setting up Google authentication with current Fragment-ViewModel architecture was a little tricky. I tried to keep the auth data in the SharedViewModel in the spirit of keeping the transient UI data decoupled from the actual activity while trying to authenticate inside activities so it will be a little bit of a mess to understand.
- In
loginFragment, let’s add some new variables:File: <app_name>/java/loginFragment.java private int RC_SIGN_IN = 23; private Button mLoginButton; private SharedViewModel mViewModel; GoogleSignInOptions mGso; GoogleSignInClient mGoogleSignInClient;RC_SIGN_IN is just an integer that we pass as a requestcode when starting up the Google sign in activity. Since this activity is provided by Google, we’re going to need to listen for when this activity is run, and identify it correctly based on RC_SIGN_IN. The integer value in RC_SIGN_IN is arbitrary, so you can have anything else as long as it doesn’t conflict with other requestcodes on your app. mLoginButton is a Button view object that we attach a listener to. We also load the SharedViewModel that’s present during runtime in this fragment. Added to that, the last two variables give us access to Google sign in objects that we will run in a bit.
- In loginFragment’s onCreateView() method, add the following code after declaring v:
File: <app_name>/java/loginFragment.java

mLoginButton = v.findViewById(R.id.login_button);
This saves the Log In button reference for use anywhere in the fragment.
- Once the fragment is loaded, we want to listen in for the user pressing the “Sign In with Google” button. Let’s override the factory method
onActivityCreatedinsideloginFragment:File: <app_name>/java/loginFragment.java @Override public void onActivityCreated(@Nullable Bundle savedInstanceState) { super.onActivityCreated(savedInstanceState); mViewModel = ViewModelProviders.of(this).get(SharedViewModel.class); mGso = new GoogleSignInOptions.Builder(GoogleSignInOptions.DEFAULT_SIGN_IN) .requestIdToken(getString(R.string.default_web_client_id)) .requestEmail() .build(); mGoogleSignInClient = GoogleSignIn.getClient(Objects.requireNonNull(getActivity()), mGso); mLoginButton.setOnClickListener(new View.OnClickListener() { @Override public void onClick(View v) { Intent signInIntent = mGoogleSignInClient.getSignInIntent(); getActivity().startActivityForResult(signInIntent, RC_SIGN_IN); } }); }Here, we save a reference to the current
SharedViewModelinmViewModel. This gives us access to the Firebase authentication object in theSharedViewModel.mGsobuilds a sign in object with credentials for your app. The method.requestIdToken(getString(R.string.default_web_client_id))gets a reference to a string that fetches an authentication token from the Firebase service connected to your app. If you set up Firebase correctly, R.string.default_web_client_id should already be defined. If not, you can refer to the Authenticate with Firebase section in Firebase docs to manually get the ID token.
mGoogleSignInClient contains an Intent reference that we will use to start up the Google sign in activity.
In mLoginButton’s onClickListener(), we start an Intent named signInIntent using mGoogleSignInClient’s intent. After that, we start the intent for a result in the main activity, which listens for the sign in event to complete.
- Let’s add a
googleSignIn()method in ourSharedViewModel. This method returns a task that attempts to sign users in given aGoogleSignInAccountobject.
  File: <app_name>/java/SharedViewModel.java

  Task googleSignIn(GoogleSignInAccount acct) {
  Log.d(TAG, "firebaseAuthWithGoogle:" + acct.getId());
  AuthCredential credential = GoogleAuthProvider.getCredential(acct.getIdToken(), null);
  return mAuth.signInWithCredential(credential);
  }
This calls in Firebase Auth objects, signInWithCredential() method, and sends the task status back to MainActivity. The signInWithCredential() method also transfers the Google auth to Firebase auth, and gives the user permissions to use the database integrated with the app.
- In
MainActivity, let’s override theonActivityResult()method. This will enable us to listen for the external Google sign in activity and call ingoogleSignIn()we defined above to complete the authentication process.
  File: <app_name>/java/MainActivity.java

  public void onActivityResult(int requestCode, int resultCode, Intent data) {
  	super.onActivityResult(requestCode, resultCode, data);
  	// Result returned from launching the Intent from GoogleSignInClient.getSignInIntent(...);
  	int RC_SIGN_IN = 23;
  	if (requestCode == RC_SIGN_IN) {
  	Log.d(TAG, "Google Sign In attempt happening.");
  	// The Task returned from this call is always completed, no need to attach
  	// a listener.
  	Task<GoogleSignInAccount> task = GoogleSignIn.getSignedInAccountFromIntent(data);
  	try {
  	// Google Sign In was successful, authenticate with Firebase
  		GoogleSignInAccount account = task.getResult(ApiException.class);
  		mSharedViewModel.googleSignIn(account).addOnCompleteListener(new OnCompleteListener() {
  		@Override
  		public void onComplete(@NonNull Task task) {
  			if (task.isSuccessful()) {
  				Log.d(TAG, "Google Sign in succeeded");
  				mController.navigate(R.id.homePageFragment);
  			}
  			else {
  				Log.d(TAG, "Google failed", task.getException());
  				Toast.makeText(getApplicationContext(), "Failed!", Toast.LENGTH_SHORT).show();
  			}
  		}
  	});
  	} catch (ApiException e) {
  		// Google Sign In failed, update UI appropriately
  		Log.w(TAG, "Google sign in failed", e);
  		}
  	}
  	else {
  		Log.d(TAG, "Code is wrong! Got code: " + requestCode);
  	}
  }
Once the sign in is complete, the user will be navigated away from the loginFragment to the home page fragment. After you’re done adding this code, make sure your app works properly.
Setting up Database Models and Realtime Database
Let’s get to adding a Firebase database to our app.
- Go to Firebase
- Open up your project (for me it’s MealCounter)
- Select the Database pane and navigate to the Realtime Database you set up earlier
- Select the “Rules” tab from the opened window
Firebase uses noSQL structure. On a high-level, it means that the data you store in it can have as many properties as you would like it to be, unlike SQL data, in which data is structured in tables and contain a fixed number of fields. A good article to refer to for a further discussion is here.
Regardless of how we structure our data for Firebase, we need the proper permissions to access that data. This is what the Rules tab in the Console is all about. The Rules file will contain a bunch of nested lines that look very similar to JSON key-value pairs. Let’s get to editing the Rules so we can read and write the data we want into the database. Write these lines into the Rules:
{
  "rules": {
    "users":{
      "$uid": {
      ".write": "auth.uid !== null",
        ".read": "auth.uid !== null"
	    }
	 }
  }
}
This code is pretty simple. The top-level node ("rules") contains a bunch of children nodes which are rules themselves. The way we have this setup right now would read like this “only let users access the /users/$uid endpoint if the UUID they have match $uid”
On a high level, it basically tells the database to let an authenticated user access a URL only if the URL reflects their own unique identifier.
This will be all for the rules. Test it out on the Simulator for read/write/update access with authentication to make sure the permissions are right, and then select “Publish” on the top bar.
Let’s get to playing around with some data now. If you go back to the Data tab, you will see something similar to my dashboard below.

- Hover over “
yourappname” and you will see+andxsigns appear beside it. Click on+. In “Name”, type in “users”, and in “value”, type in “None”. This will make a “users” node that we need to visit using our Android app. - That’s it! Now that we have a URL to visit, we can go back to Studio to add the logic there.
Let’s think about the user flow and the data associated with it again. Once the user logs in, we want a way to say who logged in and how many meals they had swiped so far.
Let’s add logged in users to the database if they aren’t already.
- Open
MainActivity.java - In
checkUserLogin(), add/replace the following lines where necessary:File: <app_name>/java/MainActivity.java FirebaseUser currentUser = auth.getCurrentUser(); if (currentUser != null) { mSharedViewModel.checkDatabaseUser(currentUser); } else { mController.navigate(R.id.loginFragment); } - Now let’s go to
SharedViewModeland add some preliminary Firebase database variables and a new method:File: <app_name>/java/SharedViewModel.java private FirebaseUser mUser = mAuth.getCurrentUser(); private FirebaseDatabase mDatabase = FirebaseDatabase.getInstance(); private DatabaseReference mUserDatabase = mDatabase.getReference().child("users");We’re declaring mUser to make things generally smoother in the future. The two new Firebase variables we added are mDatabase and mUserDatabase. mDatabase stores the entire database reference in it (not the database itself, only a reference to it). To actually fetch data inside it, we have to point to appropriate children. In this case, since we want to get references to all existing users in
{database_url}/users/URL, we rungetReference()on the mDatabase instance.
Data Read/Write from Your Realtime Database
Now that we have the initial database modeling done, it’s time to play around with the data.
Let’s start with the checkDatabaseUser() method. This checks if the user is already present in our database. If they’re not, then they’re added to the database tables.
	File: <app_name>/java/SharedViewModel.java

	void checkDatabaseUser(final FirebaseUser user) {
        mUserDatabase.child(user.getUid()).addListenerForSingleValueEvent(new ValueEventListener() {
            @Override
            public void onDataChange(@NonNull DataSnapshot dataSnapshot) {
                if (!dataSnapshot.exists()) {
                    mUserDatabase.child(user.getUid()).child("name").setValue(user.getDisplayName());
                    mUserDatabase.child(user.getUid()).child("email").setValue(user.getEmail());
                    mUserDatabase.child(user.getUid()).child("mealCount").setValue(0);
                }
            }
            @Override
            public void onCancelled(@NonNull DatabaseError databaseError) {
                Log.d(TAG, "Can't create new user table: ", databaseError.toException());
            }
        });
    }
Let’s sift through this code to understand better. Since Firebase’s Realtime Database is supposed to give immediate access to information, the API also ships with a feature to listen for immediate changes in the data structures in the selected parts of the database. For example,
mUserDatabase.child(user.getUid()).addListenerForSingleValueEvent(new ValueEventListener() {
This sets up a listener that listens for a single update in the{database_url}/users/<uuid>/ link. The onDataChange() method that this interface implements gives access to a “snapshot” of the database from that particular link. Right now, since we just made this new database, it doesn’t contain anything in that URL, which is why dataSnapshot.exists() evaluates to false.
Since the data isn’t on the database, we add it. The way to do it is very simple. We find the right node that we want to write the data to, and we trigger a .setValue() method on that node. In this project,
   mUserDatabase.child(user.getUid()).child("name").setValue(user.getDisplayName());
   mUserDatabase.child(user.getUid()).child("email").setValue(user.getEmail());
   mUserDatabase.child(user.getUid()).child("mealCount").setValue(0);
lines write the Firebase User’s name in /users/<uuid>/name field, the email in /users/<uuid>/email/ field and the number of meals they have in /users/<uuid>/mealCount URLs. Note: setValue replaces the values in the field you’re writing your data to. Firebase also provides an updateChildren() method if a node contains multiple children. More information is here.
Our user initiation steps are complete. Now it’s time to add the details to the homePageFragment and display the data there. Add the following lines to fragment_home_page.xml:
File: <app_name>/res/layout/fragment_home_page.xml

<?xml version="1.0" encoding="utf-8"?>
<android.support.constraint.ConstraintLayout xmlns:android="http://schemas.android.com/apk/res/android"
  xmlns:tools="http://schemas.android.com/tools"
  android:layout_width="match_parent"
  android:layout_height="match_parent"
  tools:context=".fragments.HomePageFragment">

	 <LinearLayout  android:layout_width="match_parent"
	  android:layout_height="match_parent"
	  android:orientation="vertical"
	  android:gravity="center">
		 <TextView  android:layout_width="wrap_content"
		  android:layout_height="wrap_content"
		  android:id="@+id/meal_count"
		  android:textSize="60sp"
		  android:textColor="@color/colorPrimary"
		  android:layout_marginBottom="10sp"/>
		 <TextView  android:layout_width="wrap_content"
		  android:layout_height="wrap_content"
		  android:text="@string/meals_left"
		  android:layout_marginBottom="20sp"
		  android:textColor="@color/colorPrimary"/>
		 <Button  android:id="@+id/swipe_meal"
		  android:layout_width="200sp"
		  android:layout_height="50sp"
		  android:layout_gravity="center_horizontal"
		  android:layout_marginBottom="20sp"
		  android:background="@drawable/rounded_button"
		  android:text="@string/swipe_meal"
		  android:textColor="@color/colorPrimary"
		  />
		 <Button  android:id="@+id/update_meals_button"
		  android:layout_width="250sp"
		  android:layout_height="50sp"
		  android:layout_gravity="center_horizontal"
		  android:layout_marginBottom="20sp"
		  android:background="@drawable/rounded_button"
		  android:text="@string/update_meal"
		  android:textColor="@color/colorPrimary"
		  />

	</LinearLayout>

</android.support.constraint.ConstraintLayout>
Update strings.xml:
File: <app_name>/res/values/strings.xml

<resources>
 <string name="app_name">Meal Counter</string>

 <string name="hello_blank_fragment">Hello blank fragment</string>
 <string name="welcome">Welcome to Partial Meal Counter!</string>
 <string name="welcome_desc">This simple app lets you keep track of how many partial
    meals you have.</string>
 <string name="login">Log In with Google</string>
 <string name="swipe_meal">Swipe a Meal</string>
 <string name="update_meal">Update your Meal Count</string>
 <string name="meals_left">meals left</string>
 <string name="enter_meals">Enter new number of meals:</string>
 <string name="meals_hint">e.g. 1234</string>
</resources>
Before we move on to the homePageFragment logic, let’s discuss how homePageFragment is supposed to behave. The “Swipe” button is there to deduct a meal on the press. So, whenever Swipe is pressed, the database decreases the number of meals left by one. Let’s implement that logic in SharedViewModel.
First, we need to read the current number of available meals in the database. We can do this by setting up a listener inside SharedViewModel that our homePageFragment uses to keep track of the meal count:
File: <app_name>/java/SharedViewModel.java
private ValueEventListener dataChangeListener = new ValueEventListener() {
    @Override
  public void onDataChange(@NonNull DataSnapshot dataSnapshot) {
        if (dataSnapshot.exists()) {
            mCurrentMealCount.setValue(dataSnapshot.getValue());
  }
    }

    @Override
  public void onCancelled(@NonNull DatabaseError databaseError) {

    }
};
mCurrentMealCount has not been defined yet. This is going to be a data structure named LiveData, which is another nifty part of the new Android Architecture. Essentially, LiveData are classes that can be observed by Activity and Fragment listeners for updates. This is especially relevant in this scenario since we have to fetch the most recent data from the database and display it on the UI, but to keep the data decoupled from the UI, we will implement this LiveData and have observers setup in homePageFragment.
File: <app_name>/java/SharedViewModel.java

private MutableLiveData<Object> mCurrentMealCount = new MutableLiveData<>();
public MutableLiveData<Object> getCurrentMealCount() {
    return mCurrentMealCount;
}
Now, let’s write the database access and update methods in SharedViewModel:
File: <app_name>/java/SharedViewModel.java

// Fetches the latest meal count from Database.
public DatabaseReference getMealCountfromDatabase() {
    return mUserDatabase.child(mUser.getUid()).child("mealCount");
}

// This method is called by homePageFragment
public void swipeMeal() {
    Long current = (Long) getCurrentMealCount().getValue();
  mUserDatabase.child(mUser.getUid()).child("mealCount").setValue(--current);
}
In homePageFragment’s onCreateView(), add the following lines (if onCreateView isn’t there yet, copy and paste the whole codeblock):
File: <app_name>/java/homePageFragment.java

@Override
public View onCreateView(LayoutInflater inflater, ViewGroup container,
  Bundle savedInstanceState) {
    Log.d(TAG, "onCreateView");
  // Inflate the layout for this fragment
  View v = inflater.inflate(R.layout.fragment_home_page, container, false);
  mSwipeButton = v.findViewById(R.id.swipe_meal);
  mUpdateButton = v.findViewById(R.id.update_meals_button);
  mMealCount = v.findViewById(R.id.meal_count);

 return v;
}
Don’t forget to declare the new variables as well!
File: <app_name>/java/homePageFragment.java

private SharedViewModel mViewModel;
private Button mSwipeButton;
private Button mUpdateButton;
private TextView mMealCount;
The bulk of the work happens in the onActivityCreated() method. Here’s the code for that section:
File: <app_name>/java/homePageFragment.java

@Override
public void onActivityCreated(@Nullable Bundle savedInstanceState) {
    Log.d(TAG, "onActivityCreated");
 super.onActivityCreated(savedInstanceState);
  mViewModel = ViewModelProviders.of(getActivity()).get(SharedViewModel.class);

  //Sets up an observer that observes for changes in mealCount for the logged in user.
  ValueEventListener mealListener = mViewModel.getDataChangeListener();
  mViewModel.getMealCountfromDatabase()
            .addValueEventListener(mealListener);
 final Observer<Object> mealCountObserver  = new Observer<Object>() {
        @Override
  public void onChanged(@Nullable Object o) {
            mMealCount.setText(String.valueOf(o));
  }
    };
  mViewModel.getCurrentMealCount().observe(getViewLifecycleOwner(), mealCountObserver);

  // OnClickListener on mSwipeButton. Swipes a meal off and deducts it from Firebase.
  mSwipeButton.setOnClickListener(new View.OnClickListener() {
        @Override
  public void onClick(View v) {
            if ((Long) mViewModel.getCurrentMealCount().getValue() == 0) {
                Toast.makeText(getActivity(), "You have no swipes left!",
  Toast.LENGTH_SHORT).show();
  }
            else {

                mViewModel.swipeMeal();
  }
        }
    });

  mUpdateButton.setOnClickListener(new View.OnClickListener() {
        @Override
  public void onClick(View v) {
            Navigation.findNavController(v).navigate(R.id.updateMealsFragment);
  }
    });
}
Let’s see what’s going on here. At first, it fetches the SharedViewModel instance from its parent activity. Then it sets up the dataChangeListener that observes the mealCount incoming from the database. Once the mealcount updates, dataChangeListener updates the LiveData mCurrentMealCount, which in turn triggers the change in the UI brought in by mealCountObserver.
The OnClickListener attached to the Swipe button simply deducts a meal and updates the database in the SharedViewModel class.
Lastly, mUpdateButton launches the updateMealsFragment, which lets the user override the past mealCount for a new mealCount.
Here’s the layout file for updateMealsFragment:
File: <app_name>/res/layout/fragment_update_meals.xml

<?xml version="1.0" encoding="utf-8"?>
<android.support.constraint.ConstraintLayout xmlns:android="http://schemas.android.com/apk/res/android"
  xmlns:tools="http://schemas.android.com/tools"
  android:layout_width="match_parent"
  android:layout_height="match_parent"
  tools:context=".fragments.updateMealsFragment">

	 <LinearLayout  android:layout_width="match_parent"
	  android:layout_height="match_parent"
	  android:orientation="vertical"
	  android:gravity="center">
		 <TextView  android:layout_width="wrap_content"
		  android:layout_height="wrap_content"
		  android:text="@string/enter_meals"/>
		 <EditText  android:id="@+id/new_meal_count"
		  android:layout_width="200sp"
		  android:layout_height="50sp"
		  android:hint="@string/meals_hint"
		  android:gravity="center"
		  android:inputType="number"/>
		 <Button  android:id="@+id/update_meals_button"
		  android:layout_width="250sp"
		  android:layout_height="50sp"
		  android:layout_gravity="center_horizontal"
		  android:layout_marginBottom="20sp"
		  android:background="@drawable/rounded_button"
		  android:text="@string/update_meal"
		  android:textColor="@color/colorPrimary"
		  />
		 </LinearLayout>
</android.support.constraint.ConstraintLayout>
in updateMealsFragment, we’re going to define the ViewModel, Button and EditText variables like so:
File: <app_name>/java/updateMealsFragment.java

private Button mUpdateButton;
private EditText mNewCount;
private SharedViewModel mViewModel;
Then, we store the references to these variables in onCreateView() (by this time you should be quite familiar with this UI setup syntax):
File: <app_name>/java/updateMealsFragment.java

@Override
public View onCreateView(LayoutInflater inflater, ViewGroup container,
  Bundle savedInstanceState) {
    // Inflate the layout for this fragment
  View v = inflater.inflate(R.layout.fragment_update_meals, container, false);
  mViewModel = ViewModelProviders.of(getActivity()).get(SharedViewModel.class);

  // Save button and EditText references
  mUpdateButton = v.findViewById(R.id.update_meals_button);
  mNewCount = v.findViewById(R.id.new_meal_count);
 return v;
}
The onActivityCreated() method will contain logic to handle user input and update the database with the new value accordingly. Here’s the code for that:
@Override
public void onActivityCreated(@Nullable Bundle savedInstanceState) {
	super.onActivityCreated(savedInstanceState);
	mUpdateButton.setOnClickListener(new View.OnClickListener() {
		@Override
		public void onClick(View v) {
			String countData = mNewCount.getText().toString();
			try {
				long dataToUpdate = Long.parseLong(countData);
				if (dataToUpdate > 0) {
					mViewModel.updateMealCount(dataToUpdate);
					getActivity().onBackPressed();
				}
				else {
					Toast.makeText(getActivity(), "Please enter a valid meal count.",
					Toast.LENGTH_SHORT).show();
				}
			}
			catch (Exception e) {
				Toast.makeText(getActivity(), "Please enter a valid meal count.",
				Toast.LENGTH_SHORT).show();
			}
		}
	});
}
Added to that, the last method we’ll add is updateMealCount in SharedViewModel.
File: <app_name>/java/SharedViewModel.java

public void updateMealCount(Long newCount) {
    if (newCount > 0) {
        getMealCountfromDatabase().setValue(newCount);
  }
}
Wrapping Up
After you implement all the above, you will have a minimal but functional Meal Counter app. What it does is quite simple on the high level, but this simple idea implements a lot of sophisticated and powerful design techniques that we saw through this tutorial. Most importantly, you will have a good basic knowledge of how to setup Google Authenticaion, manipulate data in the Google Firebase Realtime Database and set it up properly with observers and LiveData on the Android app of your liking.
Hope you found this blog post helpful. Feel free to reach out to me at my e-mail. Thank you.